Welcome to the LOKLiK iPrinter™ DTF-A3-XP600 Support Center! Here, you'll find everything you need to set up, operate, and maintain your printer with ease. Whether you're a new user or troubleshooting a specific issue, our User tutorial videos, software downloads, FAQs, and maintenance guides provide step-by-step assistance.
We are committed to delivering fast and efficient support to keep your printer performing at its best. Need further help? Check out our after-sales policy for additional assistance.
User Tutorial Videos
Here you can quickly get started by watching step-by-step tutorial videos.
User Tutorial Videos
Essential Software Downloads
Here you can download the necessary software for your LOKLiK iPrinter™ DTF.
• Betterprinter and RIIN software need to be copied to the computer for decompression. Do not decompress and use it on the USB flash drive.
FAQs
Here you can find detailed guides and solutions to common issues.
How to Fix Ink Absorption Issues
Step 1:
1. Lift the machine cover and take off the window panel. | 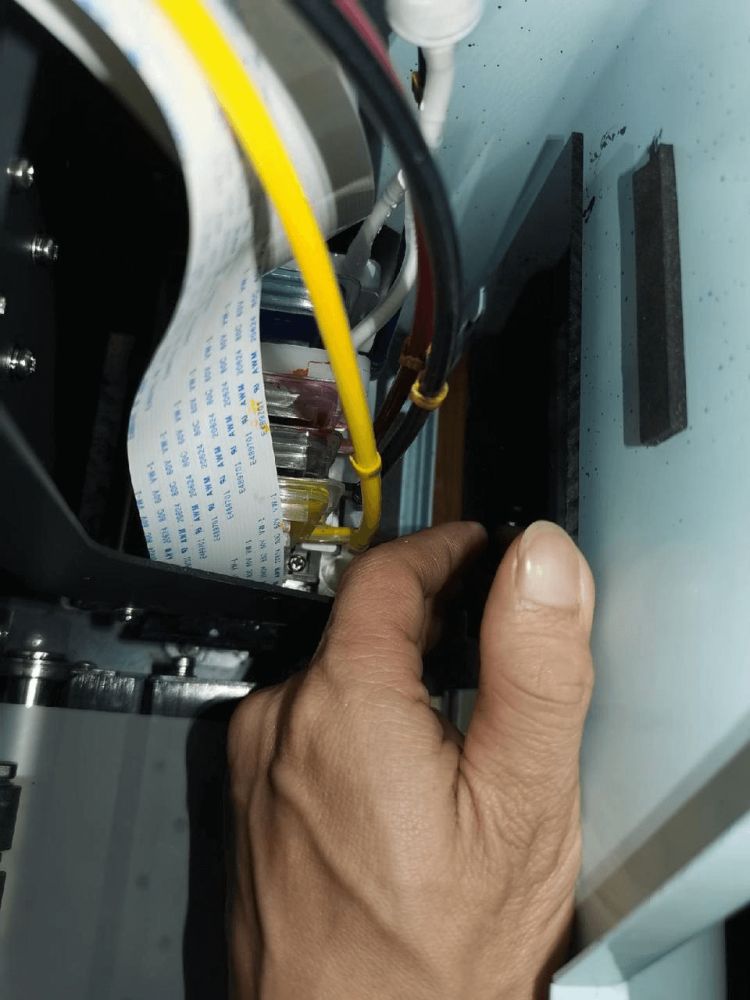
|
2. Gently press the ink sac to make sure it’s snugly connected to the printhead. | 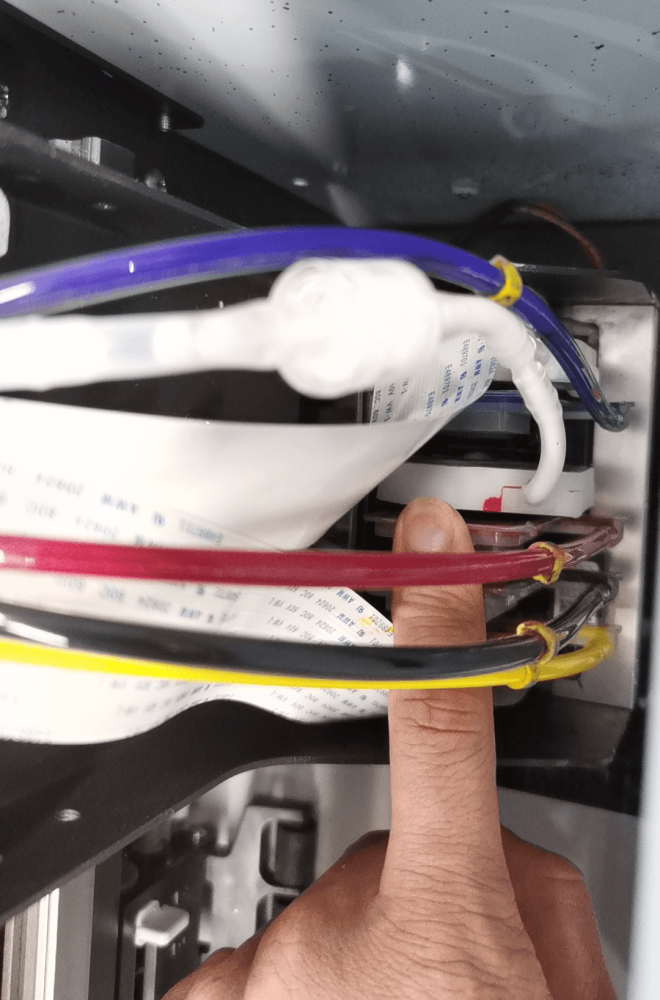
|
3. Check if the K, C, M, Y, and W ink tubes are submerged. If not, push them in and add ink until they’re at least 5cm below the liquid level. | / |
4. Power on the machine and open the BetterPrinter software. Go to "Print set" and find the "Add ink" section on the right. Click "Start" and listen for the ink pump working. While the ink is being drawn in, carefully check: | 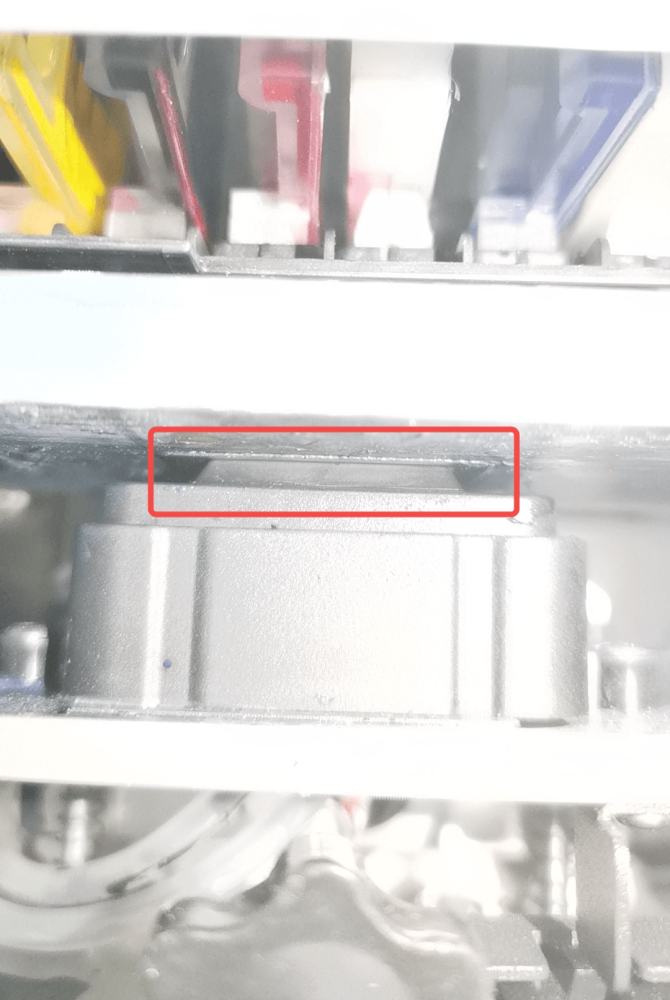
|
5. Ensure the entire ink flow system—ink, tubes, sac, printhead, and ink pad—is airtight. When ink flows smoothly into the printhead, through it, and into the waste ink bottle, stop the process by clicking "Stop" in the "Add ink" section of the "Print set" page in BetterPrinter. | / |
Step 2: How to Adjust the Printhead If It’s Not Centered on the Ink Pad
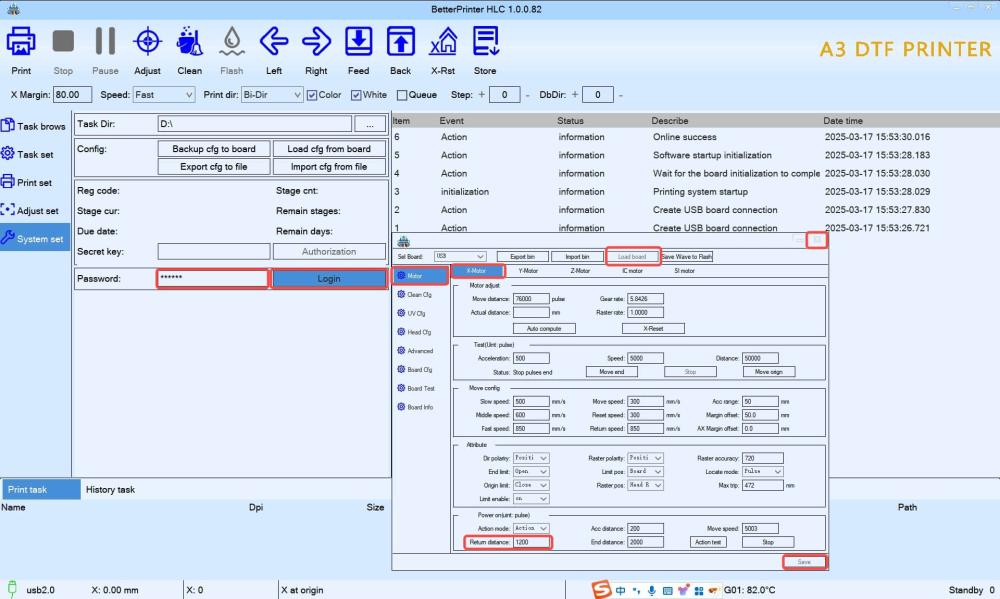
| 1. Open BetterPrinter software. Go to the "System set" page, enter "666888" in the "Password" blank, and click "Login" to access the parameter settings. In the pop-up window, click "Load board" at the top, then select "Motor" on the left panel. Locate the "Power On" section and adjust the "Return distance" value accordingly: • If the print car is too far to the left, decrease the value. • If the print car is too far to the right, increase the value. (Recommended range: 10-1000)
|  |
2. Click "Save", confirm the success prompt, then close the settings page, exit the software, and power off the printer. | / |
3. Restart the device and check the print car’s position when it resets. During cleaning or ink suction, ensure the printhead is correctly centered on the ink pad. | / |
Step 3: How to Adjust the Ink Pad for a Tight Seal Against the Printhead Base
| 1. Open BetterPrinter software, go to the "System set" page, enter "666888" in the "Password" field, and click "Login" to access the parameter settings. | / |
2. In the pop-up window, click "Load board", then select "Clean cfg" on the left panel. Locate the "IC Motor" section and adjust the following parameters: • Flash height : typically 200. Click "Test" to observe. • Pump height and Protect height: typically 600-750. Click "Test" to observe. • Scrap ink height: typically 200-300. | 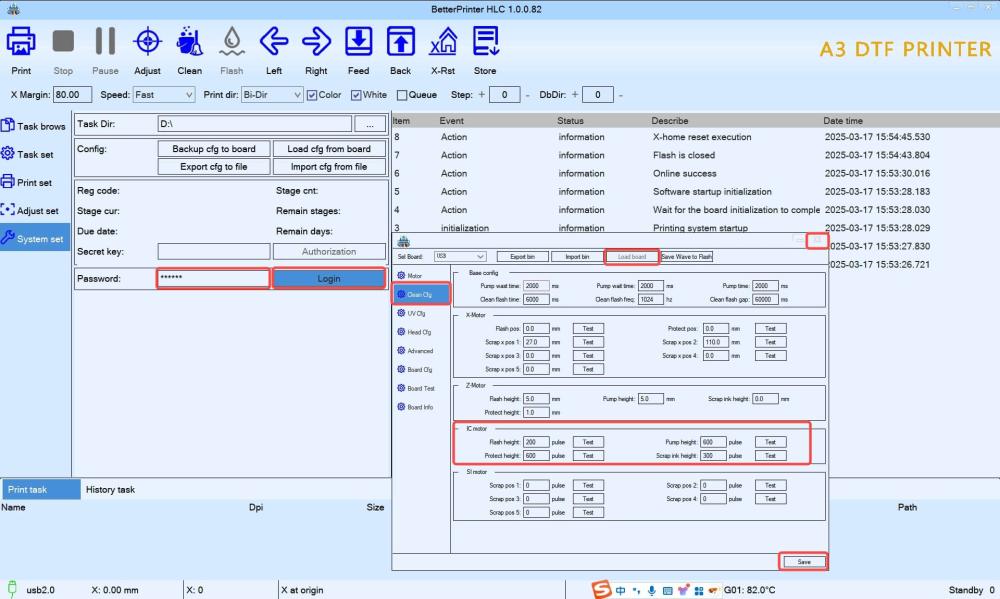 |
3. Click "Save", confirm the success prompt, then close the settings page, exit the software, and power off the printer. | / |
4. Restart the device and check the print car’s position when it resets. During cleaning or ink suction, ensure that the ink pad forms a complete seal with the printhead base, leaving no gaps. | / |
Step 4: Further Troubleshooting If Ink Absorption Still Fails
If the ink pad is correctly aligned with the printhead and tightly sealed, but the issue persists, try the following steps:
| 1. Move the print car away from the ink pad. | 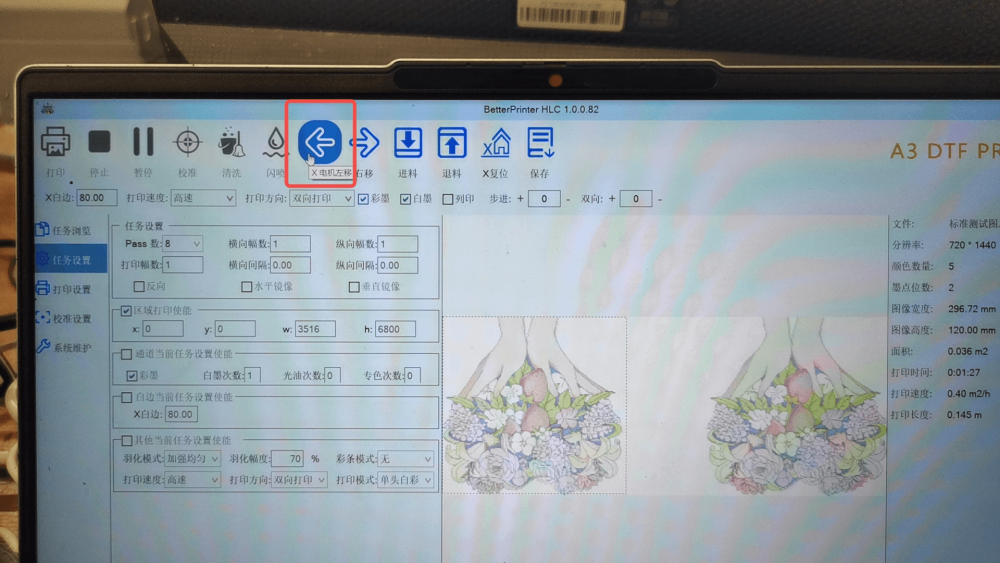 |
2. Without closing the software, turn off the machine’s power and pour a small amount of warm water onto the ink pad. | 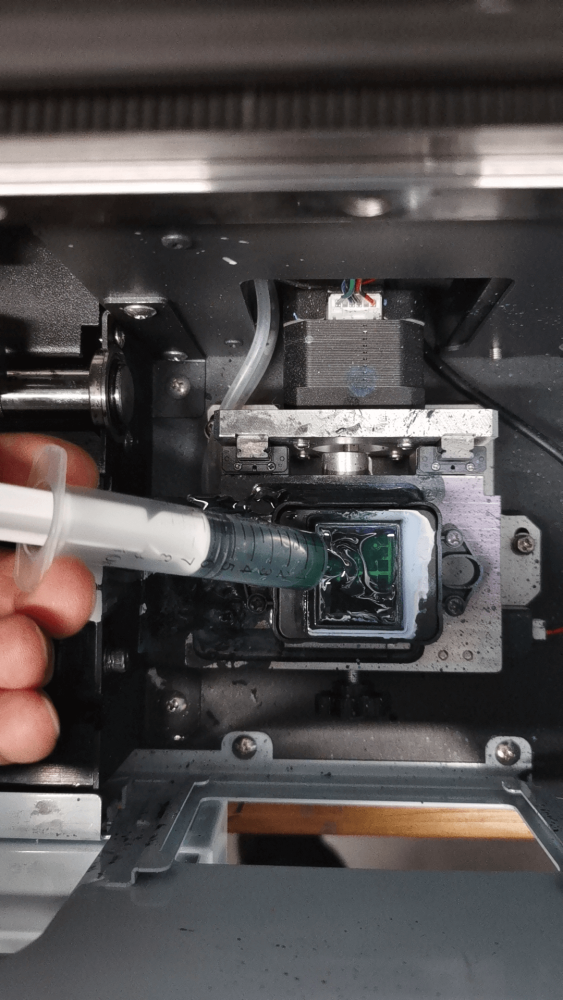 |
3. Pull out the waste ink tube from the waste ink bottle. Insert a syringe into the tube and suction. • Repeat this process 2-3 times. | 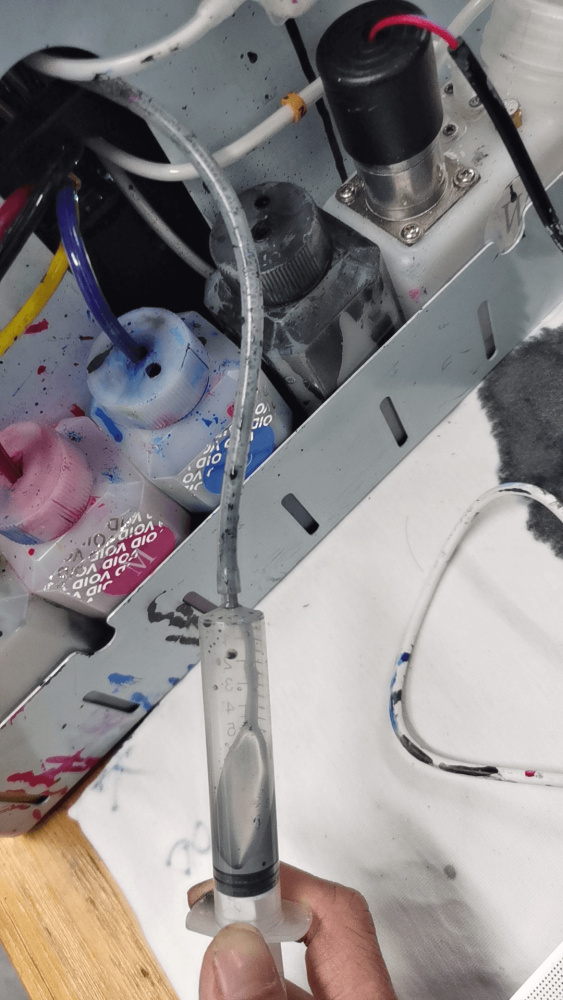 |
4. Put the waste ink tube back into the waste ink bottle. | / |
5. Turn the printer back on and start the "Add ink" process. | / |
How to Solve Stretched Printed Image?
| 1. Open BetterPrinter software. On the "System set" page, enter 666888 in the "Password" field and click "Login" to access the parameter settings page. On the new page, click "Load board" at the top. Then, click "Motor" on the left side of the page, select the "YMotor" tab on the right, and enter 50(mm) in the "Motor distance" field under "Motor adjust". Click "Print test file". Measure the actual printed distance between the two straight lines using a ruler. Enter the measured value (e.g., 49.9mm, recommended to be accurate to one decimal place) in the "Actual distance" field. Click "Computer gear" again. | 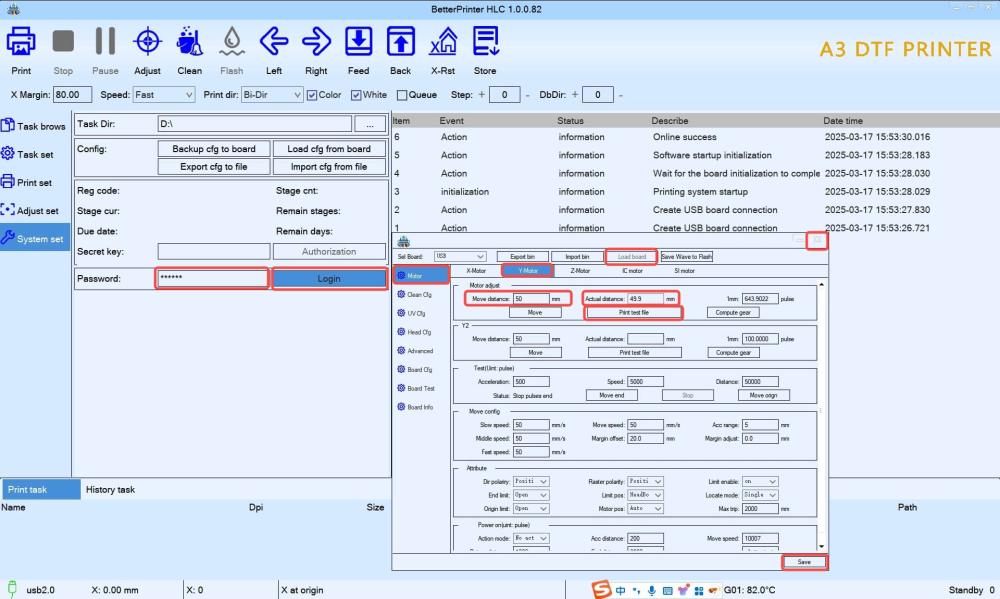 |
| 2. Click "Save" on the pop-up page. Once the success message appears, close the page, exit the software, and turn off the printer's power. | / |
| 3. Restart the device and print the image again. If there is still a slight deviation, repeat the adjustment and testing process. | / |
How to Fix Slow Printing Speed
| 1. Ensure the the computer and printer are connected via the USB cable directly. Do not use a USB hub. | / |
| 2. Copy the softwares to the computer before use—do not run it directly from a USB drive. | / |
| 3. Launch BetterPrinter software first, then open the RIIN software. | / |
| 4. Set "Send Type" to "File" in RIIN software when printing an image. Click "Print" and save the file. | 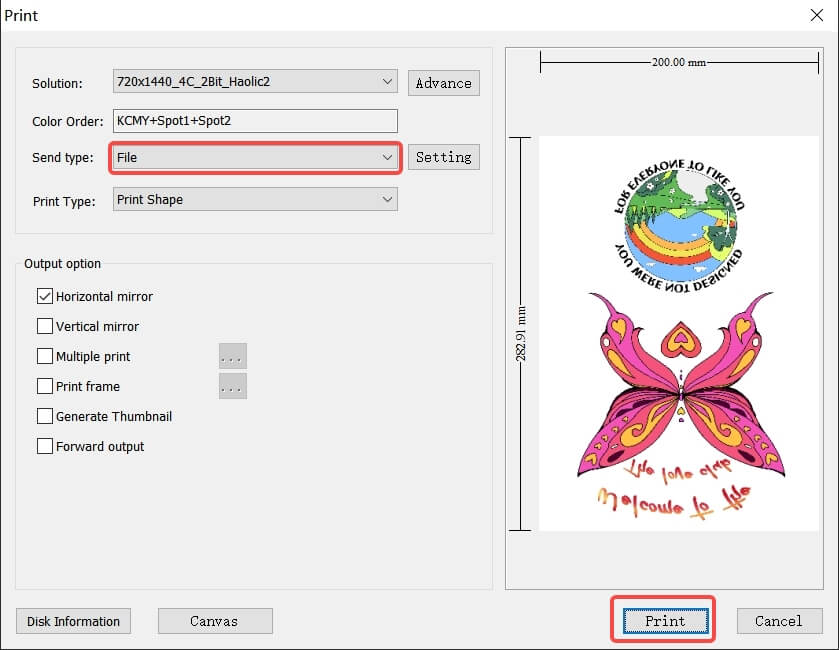 |
| • The file will be saved in the "PrintFile" folder on the desktop (e.g., named "1620"). | 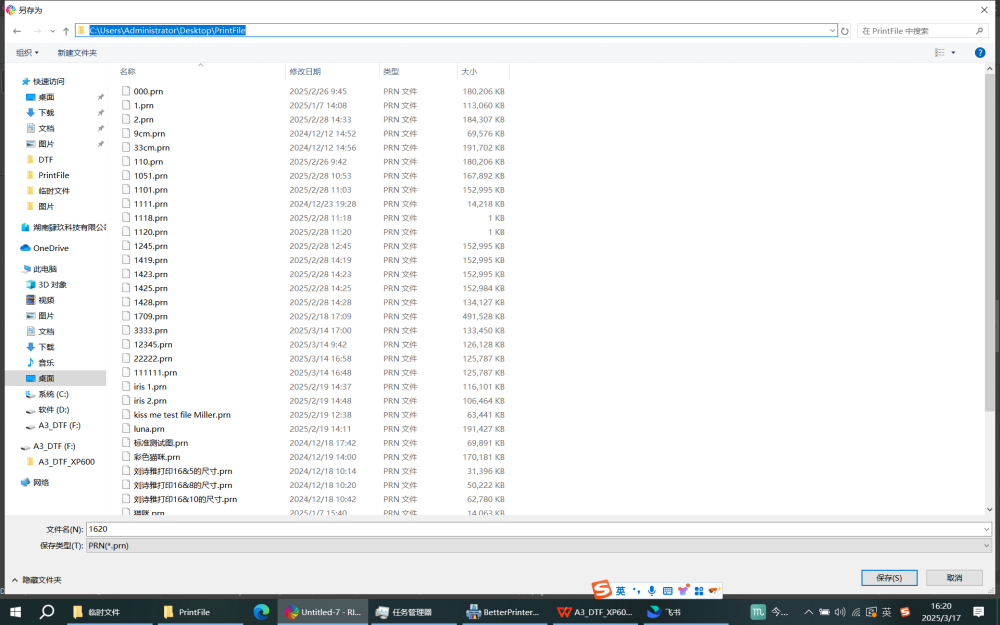 |
• Open BetterPrinter software, select "Task Brows" on the left panel. | / |
| • Navigate to the "PrintFile" folder. | / |
• In the preview pane on the right, right-click and select "Refresh". | / |
• Double-click the newly created file ("1620.prn"). You will see it listed under "Print Task" at the bottom. | 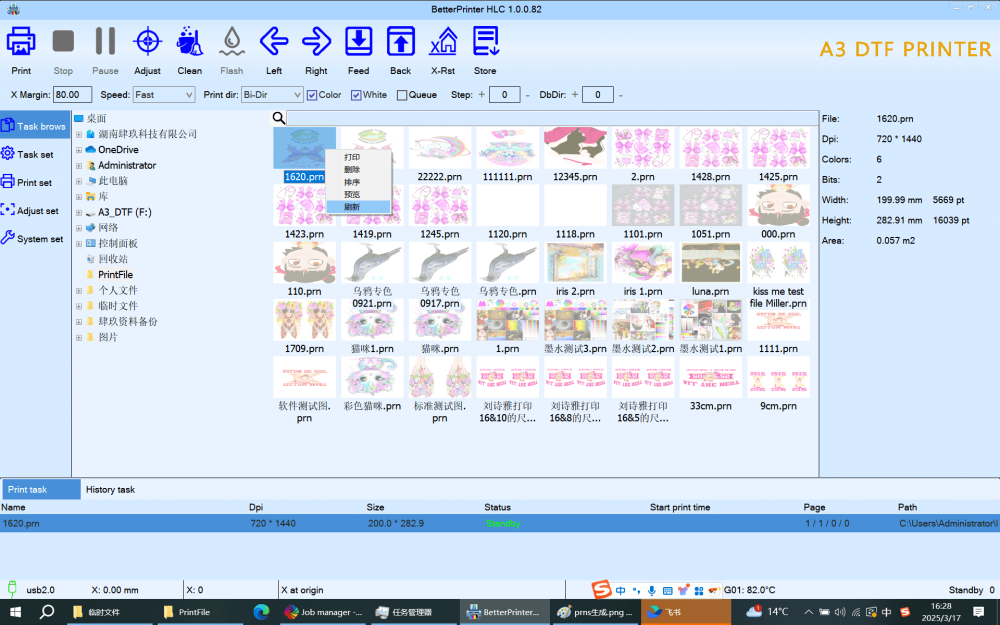 |
• Click "Print" in the top left corner to start printing. | / |
5. If printing is still slow, try using a different USB cable and test again. | / |
Additional Questions
What to do if print colors fade or look incorrect?
A1: Do a nozzle ADJUST check to see if there are any ink breaks. If so, do the nozzle CLEAN task in the software;A2: Ensure using LOKLiK original ink.
What to do if the nozzle statue appears poor after performing nozzle adjust task?
A1: Ensure the ink pad and printhead are tightly sealed without any gaps, and check if there is any waste ink produced during the cleaning process.
How to fix a clogged printhead?
A1: Do the nozzle ADJUST task and check the nozzle statue result. If there are any ink breaks, perform the nozzle CLEAN function in the software;A2: Gently clean the printhead with a lint-free cloth and cleaning solution. For stubborn clogs, please contact LOKLiK customer service;A3: If the printer won’t be used for a while, apply a moisturizing solution to keep the printhead in good condition.
What to do if the computer can not connect to the printer?
A1: Ensure the printer is powered on;A2: Ensure the USB port of the computer is working properly;A3: Try with a new USB data cable;A4: Ensure the USB driver is working properly.
How to use the film correctly?
A1: Ensure the film is installed correctly with its edges aligned parallel to the vacuum suction platform;A2: Make sure the matte side of the film is facing up;A3: Please use professional DTF transfer film.
What to do if the printer suddenly stops printing?
A1:Stop and delete the ongoing task, then restart the software, printer, and computer and try again.
What to do if the ink adhesion is poor?
A1:Adjust the oven temperature and pressure settings, and reduce the ink consumption in RINN.
More Maintenance Tutorial Videos
Here you can learn how to maintain your printer, replace key components, annd trouble shoot common issues for smooth operation.
LOKLiK iPrinter™ DTF-A3-XP600 After-Sales Policy
Contact Info
Phone: +1 855-908-0870
*You can still contact us at HTVRONT, and we will be happy to assist you with your issue.
Customer Service
Thank you for choosing us! We are dedicated to providing you with high-quality customer service.
Our customer support team is made up of professionally trained and experienced representatives who are committed to providing you with excellent service;
We offer multiple contact options: phone, email, live chat, and social media. Details are available on our website:
https://www.loklik.com/contact;
c. Response Time
Our customer support team will respond to your messages within 24 hours;
d. After-sales Policy
We offer refund/return/repair services to ensure your satisfaction with our products. If you have any questions, contact us with supporting evidence (e.g., pictures/videos/order number), and we will promptly process your request;
e. Customer Feedback
We value your feedback to help us improve our services. Feel free to contact us with any comments or suggestions.
Return and Exchange Service
We accept product returns and exchanges within 30 days of receipt if the original packaging is unopened. Returns or exchanges cannot be processed if the original packaging has been opened.
To ensure your return or exchange is approved, please meet the following conditions:
a. Non-quality issues
The product must be in its original, unopened packaging;
The product must be unaltered;
The product must include the purchase invoice or order number.
*You are responsible for the return shipping fee for non-quality returns. Your request will be rejected if the product is damaged during the return shipping.
b. Quality issues or defects
If the product has quality issues, contact customer service immediately. Returns without prior approval will not be accepted.
Processes
Follow the steps to initiate a return or exchange:
a. Contact customer service within 30 days of receipt, providing your order number and reason for return/exchange;
b. We will provide further instructions after verifying your return request;
c. Please ship the product with the original packaging and all accessories;
d. We will inspect it and process your refund or exchange upon receiving the returned product. If the product does not meet the conditions, your request will be rejected.
Refund
Approved refunds will be issued to the original payment method within 7 business days. Refunds will be issued minus the original shipping fees, processing fees, and any discounts applied at the time of purchase.
Exchange
Exchanges will be processed and shipped within 7 business days after receiving the returned product.
We will send the tracking number to your email.
For any issues after receiving the product, contact customer service for assistance.
Warranty Service
Coverage
a. Motherboard
The motherboard is covered by a 6-month Warranty from the date of shipment, and it is limited to a one-time replacement within the Warranty period;
b. Printhead and Related Components
The printhead is covered by a 6-month Warranty from the date of shipment, and it is limited to a one-time replacement within the Warranty period;
c. Other Accessories
Other accessories, excluding materials (such as ink, ink bottles, ink tubes, ink pads, and ink scrapers), are covered by a 12-month Warranty from the date of shipment;
d. Any replacement product or parts installed during the warranty period will be covered under the original warranty for the remaining duration. Any replaced product or parts will become the property of LOKLiK;
e. Disclaimer
● The Warranty for the ink-contact components requires the printer to use LOKLiK ink exclusively. Warranty coverage does not include the printhead blockage resulting from using ink from other brands;
● This warranty extends only to those products purchased and used within the continental United States (excluding Alaska, Hawaii, Guam, Puerto Rico, and the U.S. Virgin Islands) and which were initially purchased by you from the LOKLiK official store;
● Warranty excludes damage caused by user negligence or improper use, and the damage must be confirmed by our customer service team or engineers as non-user-induced.
Fee
If a component is damaged within 30 days of receiving the printer, we will bear the cost of the component and cover the shipping fees. For damage reported after 30 days of printer receipt, we will cover the cost of the component but will not cover the shipping fees.
We offer remote expert guidance for all customers who have purchased a LOKLiK iPrinter™ DTF-A3-XP600 and are within the Warranty period. Please note that remote services will be processed after statutory holidays should they occur. For specific matters, we recommend contacting our customer service team in advance. Thank you for your understanding.
Please note that this Warranty policy is subject to change, and any modifications will be posted on our website. For any Warranty claims or inquiries, you can contact our customer service team.
This Warranty does not cover:
To the extent permitted by applicable laws, LOKLiK is not responsible for the Warranty in the following situations:
(1)Malfunctions caused by improper use, maintenance, and storage by consumers;
(2)Malfunctions caused by self-repair or dismantling by those who do not undertake the three-guarantee repair without the permission of our company;
(3)Products that can continue to be used after repair when the Warranty expires;
(4)Damage caused by force majeure.;
(5)Products with no Warranty card or purchasing invoice.
Meanwhile, LOKLiK disclaims all implied and legal warranties, including warranties of merchantability and fitness for a particular purpose. The warranties that are allowed to be denied are for the duration of this Warranty.
Usage Instructions
Please read the User Manual carefully and follow the instructions for proper product use.
Keep the original packaging for futurereturns or repairs. The original packaging provides better protection during shipping.
Customer Service
If you have any questions or concerns, please contact us at
support@loklik.com.
This Warranty provides you with specific legal rights. You may also have additional rights depending on your state or country, as local laws may not allow certain limitations or exclusions, including the Warranty period for this machine. Proof of purchase is required for Warranty service.
Warranty Issued By:
HK SIJIU INTERNATIONAL SHARE CO., LIMITED


